The humble chicken is a worthwhile pet, a voracious eater of insects, and a sumptuous provider of meals when raised properly. A safe and simple way to keep your birds healthy and happy is by building or buying a mobile chicken coop, sometimes called a chicken tractor. A chicken tractor provides an enclosed space with access to an open floor and covered area, allowing the fowl to scratch and peck as nature intended, with human-supplemented food and water.
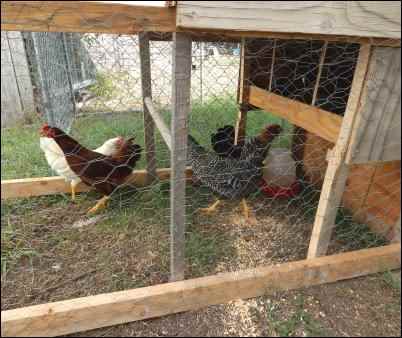
A small chicken tractor can hold half a dozen birds and still be light enough to be moved as regularly as daily or every other day. This allows fresh green grass and a new panoply of bugs and worms for them to hunt each day. Larger chicken tractors can accommodate hundreds of birds and are moved with a farm tractor but that lies outside of the skill, purview, and interest of many homesteaders. Having a few chickens for a regular supply of eggs and/or meat is an excellent way to expand your food supply, become more self-sufficient, and is an excellent chore for children and adults alike.
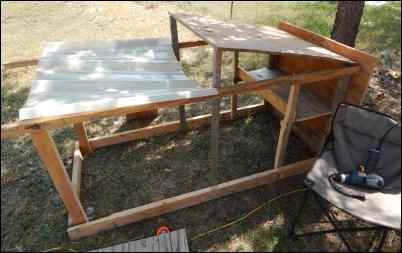
Start by making a simple square with the bottom runners and two of the horizontal pieces. This will form the bottom of the chicken tractor. Then take four of the vertical posts and screw them at the corners of your square. Screw the other two vertical posts at a distance of a foot away from one end of your tractor. Those two middle posts will form the front part of your roosts in your tractor. Take your top runners and mount them with the extra length away from the back of the tractor. he extra length will become the front of your tractor and the handles that you will use to move it.
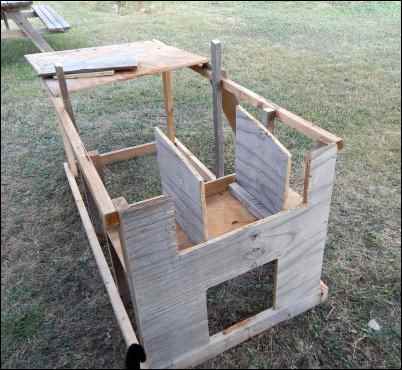
Your laying boxes should be made to have four of the six sides made of plywood and mounted to the roof, which covers the fifth side. At the front take a two-inch piece of plywood, or lumber, to create a threshold to keep the hay in. You should now be looking at a large empty frame. Start wrapping the walls with your wire cloth, or chicken wire, but leave a few inches overlapping at the top. When you put on your roof, push the chicken wire inside and put the roof on top. Using one- inch nails/screws, firmly attach the roof to the top support runners and decide on a roughly central location for a door to put in and take out food and water.
Now that you have your tractor built it is time for you to get the actual chickens. If you are like me you will have been waiting impatiently for your first of hopefully (fingers crossed) many chickens to enjoy their new domicile. There are three ways to get your first chickens: find live birds for sale or trade, order them from a hatchery, or most feed stores will have some for sale during the spring. Be prepared with food, food buckets or feeders, and a way to get them continuous access to water. This last part has always been very important to me as it is very easy for chickens to overheat in the Texas sun.
If you are getting adult chickens, or pullets a month or older, then you won’t need to worry about the next part… Picking up chicks! I just love the way that sounds.
My first chickens were purchased at the very same feed store my uncle had been frequenting for years and I made a few mistakes. Really everything after this sentence should be treated as a mistake; I’ll list out what you should actually do in a minute.
Considering I had completed my tractor months in advance, I had stopped paying much attention to the weather or the date as my side business of trimming trees had begun in full force once winter settled in. I was heading home after a job and needed to stop for a few tools when I sauntered into the feed store and there they were: two long cattle troughs under heat lamps with a delightful chirping beckoning me; in a trance, I moved closer. I had completely forgotten that it was the first week of March and the feed store had gotten their first shipment of chicks. I stood awestruck as assorted employees asked me questions that I’m fairly sure I simply didn’t answer. Two hundred chicks of assorted breeds yearned to come home with me but I could only truly house three or four of them to adulthood.
I couldn’t just get a few. A brilliant plan emerged; I’d buy 5 and butcher the smallest of them. I had heard that poultry houses could butcher their chickens at six weeks. Easy-peasy, I had it all figured out. I bought my five, put them in their appropriate box and (I hate to admit this lack of planning) bought a five-pound bag of feed, assuming they couldn’t possibly eat that much. Boy, was I wrong. I took them home, put them in a half-barrel and attached a heating lamp. I patted myself on the back for my obvious genius and drank a beer while they explored their temporary house. Consider this entire paragraph “How Not to get your First Chickens“.
You should find a nice quiet place in your house that is safe from any predators, including your house pets. I found out my chicks had learned to fly out of their crate when my girlfriend called to tell me that she found one of them under a dresser, as her two cats paced the outside edges waiting for another chance at it.
Cover the bottom of the domicile with wood shavings, pine or whatever you have available. Have plenty of feed for them, they seem to eat their weight each day and kick over, poop in, or somehow defile even more than that. Assume ten pounds per bird per month, but obviously, your experience may differ.
Have your heat lamp ready, some people have used a 100-watt bulb, but I prefer a red-colored heat lamp for no particular reason other than it looked hot. Make sure you can move the heat lamp further up or further away as the chicks grow. They need almost a hundred degrees for their first few days and five degrees less each week. Figure out how you plan to move the lamp before you put them in, reducing your chance to overheat them or let them get too cold. You can visually tell how they are handling the heat by where they sleep. If they are sleeping directly under the lamp, it’s too cold. If they sleep as far away as possible then it’s too hot.
Plan to spend a few hours the first day watching them, not only to make sure they get well acclimated but also to just enjoy watching them wobble around and explore. They will almost immediately begin establishing a pecking order; don’t interfere if one of the chicks seems to be getting picked on. If all of your chicks were born within a few days of each other, there is almost no risk of one of them getting seriously harmed. The first week will be fairly calm until you run into your first major problem. You’ll learn to hate the very word… plugging.
You see, a newborn chick doesn’t quite have the adult chickens’ natural colonic pressure to shot out feces, instead your chicks will tend to have very liquid poop. This liquid will dry around the opening of the cloacae (that is science speak for their bumhole) and become an obstruction for further eliminations. A mother hen handles this in her own way but now you have to handle it. I have tried the following with periodic success with each.
Each day, I picked up each chick and handled it a bit to get it used to people. Once it calmed down, I violated its avian privacy, and checked its bum. With well-washed hands, and a small tray of room temperature water, I soaked it gently, just the back end, and tried to gently—ever so gently—pull away any built up feces. DO NOT TUG. I have torn the gentle skin and hurt one of my chicks before and I felt terrible. Take your time. If the buildup is excessive, I have found small scissors to be useful in cutting away the plug, or small pliers from a multi-tool to crush and loosen the plug in the feathers. You don’t have to get every bit of it off of them, just make sure they can defecate without resistance. You should only have to worry about this for 10 to 14 days, after that, they will molt and have no further problems. Once you don’t have to worry about plugging anymore, then you will have to worry about them flying.
As I mentioned earlier, I found out my chicks could fly when one of them escaped and our cats had him cornered under a dresser. Thankfully, she was caught early and unharmed, except for a few ruffled feathers. Once they begin to fly you have two choices: you can either put them outside in your newly-built chicken tractor or you can cover their brooding box with some sort of wire mesh. If you choose the latter, it must be something that allows airflow. Without steady airflow, the trapped heat will cook your birds within a few hours in the best of circumstances. I can’t say this enough: if you trap off easy airflow, you will have effectively made a rotisserie oven without getting the delicious meat, just dead birds.
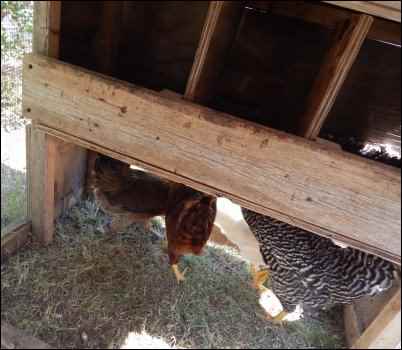
Enough of all of that worry about accidentally killing your birds, I have faith in you. Let us talk, instead, about the best part of growing your birds in a chicken tractor: fresh eggs in the summer and fall, and meat in the early winter.
Your birds should be fully grown by summer and start to produce roughly an egg per day depending on the breeds you have chosen. The first few eggs will look funny, some will be small or oblong or just plain non-standard egg-shaped. This is due to the chickens’ egg-laying parts becoming accustomed to producing eggs. These first eggs will tend to have small amounts of blood or feces on them which may require a small wash in warm water to remove. Even the most misshapen of eggs is still nutritious and suitable for eating, although, to be honest, I crack them open and feed them to my dogs, then crush the shells and feed them back to my chickens. There is no good reason for this, it’s just how I was taught to handle the first eggs.
At this point, you may want to consider providing your chickens with laying pellets or oyster shells. Both of these will be high in calcium content and help your chickens lay thicker-shelled eggs. You can mix the pellets or shells in with their regular feed or keep them in separate feeders. Your chickens will know naturally what they need and when, you just have to have everything available. Trust them, provide for them, and they will provide for you.
At some point in time, every homesteader wants to have a few chickens, and I am convinced—through trial and error—that the chicken tractor provides the best way to start with a small flock and grow from there. Take a chance, a bit of recycled lumber, and some screws and see what you think. I loved every moment of building the tractor and actually picking out chicks. I look forward to seeing my birds every day. I bet you will too.