Our half-acre lot in the ’burbs is shaded by nine mature silver maples. The only spot that gets decent sun is the gravel drive that runs to our pole barn. Even an inexperienced gardener like me suspected veggies might have a tough time growing in gravel, so I built three 4×8 raised beds. I decided to water the beds by draping them with a soaker hose, but the hose wound among the beds in a serpentine trail that left me high-stepping through the garden like a middle-aged drum major.
Figuring there had to be a better way to water a garden than tossing hose like spaghetti, I came up with my $8.16 (sales tax not included) irrigation system. I combined soaker hose, ½-inch PVC pipe, and connectors to make an irrigator that works in either raised or standard gardens. It’s a cinch to put the feeder pipes under ground (or gravel, in our case), which keeps everything tidy and impresses the daylights out of visitors.
What’s more, these plans can be adapted for additional beds or extended to fit a standard garden. After I show you how to build an irrigator for one bed or two standard garden rows, I’ll explain how to slap on more modules.
Parts
Go to a home center or hardware store and get a length of half-inch PVC pipe. (The standard length is ten feet.) While you’re there, grab a tee connector, three 90° elbow connectors, one 90º street elbow (threaded on one end) two ½-inch threaded male adapters (“red” may appear in the part description), two hose end caps, and a brass ¾-inch hose connector. You’ll also need small cans of primer cleaner and PVC cement. A parts list appears at the end of this article, but here’s what they look like:
It makes sense in a 48-inch wide raised bed to run two sections of soaker hose with equal space between each hose and the walls of the bed – in other words, 16 inches apart. (If you’re building this for a garden, adjust the distance to fit your rows.) Cut the PVC pipe so that you have four pieces that are each 2½ inches long and two pieces that are each seven inches long.
Assembly – The Front End
I designed my irrigator to go through the end of the raised bed. That meant I couldn’t glue up the parts of the irrigator until I ran the pipe through the hole I bored in the wall of the raised bed. In case you want to do the same thing, we’ll assemble the irrigator in two sections – the front end and the back end. Let’s first tackle the front end, the part that connects up to the soaker hose that will water your garden.
1. Using the swab that came with the can of PVC primer, swab the outside ends of each piece of pipe and the inside ends of each connector. The primer cleans off dirt and film left on the pipe during manufacture that might keep the cement from doing its job.
2. Swab the inside of one end of the tee connector with the PVC cement. Then, swab the outside of a 7-inch piece of pipe with cement. Stick the pipe into the connector, give it a twist, and hold it for a few seconds. The cement I use recommends holding the parts in place for 30 seconds to prevent pipe push-out, but I found ten seconds long enough for a solid hold. Repeat the process on the other end of the tee connector with the other 7-inch pipe.
3. Glue a 90º elbow connector (the kind without threads) to the other end of each 7-inch pipe. Make sure the elbow is on the same plane as the tee connector. Otherwise, you’ll have some pretty funky angles for attaching hose.
4. Glue a 2½-inch piece of pipe to each elbow connector. To each of those pieces of pipe, glue a threaded male adapter, to which you’ll later screw a length of soaker hose.
5. Head back to the ‘upright’ of the tee connector, and glue a 2½-inch piece of pipe in that open socket. This is how the front end assembly should look:
Assembly – The Back End
6. Glue a 2½-inch pipe to one end of an ordinary elbow connector. Glue the other end of the pipe to the socket end of the ½-inch, 90º, street elbow connector (the elbow with threads on one end). Point the threads toward the water supply.
7. Screw the brass swivel connector to the threaded end of the street elbow connector. The swivel connector will be the “interface,” if you will, to the garden hose that supplies the water. Here’s how the back assembly should look:
Connecting The Assemblies
8. Use a spade bit to drill a hole through the end of the raised bed. I made mine about 7/8ths of an inch in diameter – large enough to insert the front end assembly.
9. Then it’s a simple matter of cementing the open elbow connector of the back end to the open pipe of the front end.

Connecting The Soaker Hose
Okay, I confess: This project will run a tad more than eight bucks and change if you don’t already have a soaker hose. They’re nearly $12 new at a home center. Still, if you’re cheap – I mean, self-reliant – use an awl to punch a bunch of tiny holes in an already leaky garden hose, and voilá: do-it-yourself soaker hose.
Regardless of what you use, you still have to connect the hose to your tinker toy assemblage. Relax, it’s easy.
1. Figure out how long you want the hose. My raised beds are eight feet long. I guessed seven feet would work.
2. Cut the hose with a utility knife. To one end attach a female hose coupler; to the other end attach a male hose coupler. Screw a hose end cap to the male coupler, then screw the end of the hose with female coupler to the male adapter on the front assembly. Repeat the process for the other arm.
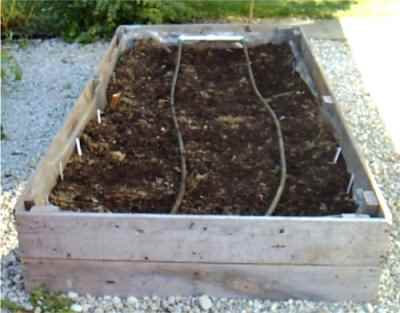
And you’re done! Well, except for the fine-tuning. Hook up your water supply, turn it on, and tighten the leaks. (They’re inevitable, I’ve decided.) Okay, now you’re done. Here’s how the finished product should look:

Adding modules
Have more than one raised bed? Trying to irrigate a garden with more than three rows? No problem. Adding on is simplicity itself. (Of course, you’ll need to pick up a few more connectors.)
1. Find the the ½-inch, 90º, street elbow connector at the bottom of the back assembly, the one to which you’ll attach the garden hose. Substitute a tee connector for that threaded elbow connector, gluing the tee connector at one of the ‘crossbars’ of the tee. Aim the tee’s ‘upright’ toward your garden hose.
2. Glue a a 2½-inch pipe to the ‘upright’ socket, then cement the pipe to the 90º street elbow. (I suggest you point the threaded end toward the ground; attaching the hose from below won’t put as much stress on the assembly than if you were to attach it from above.)
3. To the socket on the other end of the ‘crossbar’ of the tee, cement a length of pipe long enough to reach about half an inch from the ground. Then cement an ordinary elbow connector to the pipe, pointing to the next bed or garden row.
4. Attach a length of pipe long enough to reach the middle of the end of the raised bed and attach another assembly, using the same steps and parts described above. Keep adding modules as you add raised beds – I’m up to three so far.

The same approach works for a garden: Replace the bottom elbow with a tee, add pipe, attach an assembly, and repeat until you run out of rows.
Water Wonderland
With the slightest twist of your wrist you can now drench your garden with a gentle drip of moisture. Throw grass clippings or mulch on top of the hose to ensure the water stays where you put it.
Careful, though; don’t make it invisible. You’ll still want to impress the daylights out of your visitors.
Parts List (2004)
|
Part |
Number |
Lengths/Prices* |
Cost |
|
Tee connector |
1 |
$0.18/ea |
0.18 |
|
90° elbow connector (no threads) |
3 |
$0.16/ea |
0.48 |
|
90º street elbow (threads on one end) |
1 |
$0.37/ea |
0.37 |
|
¾”x½” adapter, male, red (threaded) |
2 |
$0.28/ea |
0.56 |
|
¾-inch brass hose connector, swivel, double female (¾” FHT x ½” FIP) |
1 |
$1.94/ea |
1.94 |
|
Hose end caps |
2 |
$0.93/pair |
0.93 |
|
Hose female coupler, 7/16” x ½” x 9/16” |
2 |
$1.48/pair |
1.48 |
|
Hose male coupler, 5/8” x ¾” |
2 |
$1.48/pair |
1.48 |
|
PVC pipe |
4 |
2½ inches/ea |
0.74 |
|
PVC pipe |
2 |
7 inches/ea |
|
|
TOTAL |
* = Prices as of 9/28/2004 |
$8.16 |
|
The Completed Do-It-Yourself Garden Irrigator